Turning a homemade bar of natural soap into liquid soap.Save money, and reduce soap's carbon footprint!
 The world has turned to liquid soap for it's hygienic qualities, but do we realize it means we are paying for and increasing our carbon footprint by shipping water disguised as soap? Liquid soap is 60-90% water!
Fortunately, it is possible to reduce waste (plastic container), and reduce our carbon footprint (stop shipping water), by making liquid soap from bar soap. Aside from natural bar soap being environmentally friendlier than liquid soap, it is also more economical! Think of it, 60-90% of the price you are paying for liquid soap, is after all, for the water content.
Note: if you are using commercial soap instead of natural cold processed soap to make liquid soap, you may find you can use 2 to 2.5 times the water content of this recipe. Lots of inexpensive filling & thickening chemicals are added to commercial bar soap, unfortunately.
Similarly, if you have glycerin on hand, you may find you can increase the water content as glycerin helps to bind the water to the soap, aiding in the thickening process. If you do not have glycerin, our soaps will thicken after 24-48 hrs in a cool dry area at a 4:1 water to soap ratio by weight.
You will need:
- cheese grater (optional)
- 1/2 tsp of liquid glycerin (optional)
- 2 oz /60gr natural bar of soap
- 240mL water
- hand blender
I like to make smaller quantities at a time, of course, if you use a lot of liquid soap, by all means double or quadruple the quantities
Step 1: Grate or cut the natural bar of soap into small pieces
Step 2: Fill a pot with 240ml of water and bring to a boil. Reduce heat and add the natural bar of soap shavings or small pieces. Stir until the soap is completely dissolved.
Step 3: (optional) Add 1/2 tsp of liquid glycerin and stir well. If adding glycerin, you may be able to double the water content, start with less and increase in small quantities as need be after it has cured.
Step 4: Let cure for at least 24 hours. Do not place in the fridge as the mixture will separate instead of binding together.
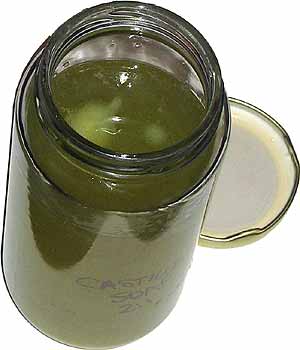
At this point your liquid soap will look like clear soapy water, but do not worry, after it has cooled completely it will thicken just like liquid soap.
Step 5: Once cured, a minimum of 24 hours, check the consistency. If the soap is too thick to pour, or thicker than you would like, you can take add just a little bit of water while beating with a hand blender until the consistency is more like liquid soap. If the soap is too thin, heat it up again over medium heat, and add up to another 1oz of soap shavings until completely dissolved. Allow it to cool completely again, if is still does not set, try whipping with a hand blender until it does.
Different soaps bear different results (runny vs hard liquid soap). Soaps with extra moisturizer, for instance, are harder to set firm. Try a soap with a bit less moisturizing, or add more soap shavings or pieces.
Step 6: Refill your 300ml bottle of liquid soap or shampoo. I like to re-use a glass olive oil bottle.
I have to admit that some soaps do turn out a little bit more slimy than others. Particularly if you find natural soaps tend to be more slimy in general. But they work great nonetheless! Well worth the effort in turning natural bar soap into liquid soap.
Note: I do not personally add glycerin to my cold processed soaps, but depending on the soaps you use, you may find it helpful to bind the water to the soap, particularly commercial soaps that are stripped of their glycerin and replaced with chemical thickening agents. Natural cold processed soap still has it's natural glycerin. Adding glycerin helps bind the soap to water, so you can use more water, and thus make more liquid soap.
Why is my homemade natural liquid soap not sudsing in water?
Homemade natural soaps clean and nourish your skin, but they generally do not create the same quality or amount of suds that commercial soaps do, particularly once diluted in water.
The type of water the soap comes into contact with is a factor in will
Natural Hair Conditioning
You can replace expensive deep conditioning salon treatments, by using coconut oil as a hair conditioner at home. Coconut oil is rich in fatty acids, which nourish and moisturize the scalp and hair. Coconut oil applied to the hair reduced hair breakage and damage. Coconut oil is a hair tonic that stimulates the scalp and encourages hair growth. Many cultures historically have and still do use coconut oil as a beauty oil. It is amazing.
You can use a tiny amount, just enough to coat the tip of your fingers, and massage into your scalp, then down into your wet hair. Use a comb to distribute evenly and get into the tips of your hair. It works best in wet hair. Coconut oil, used in small amounts, works wonderfully without weighing hair down, or making hair overly greasy. However, if you use too much, a little goes a very long way, then you might find it a little greasy.
An easier alternative? Add it directly to your liquid shampoo! It will make a conditioning shampoo! Again, a little goes a very long way. 1/2tsp melted and added to 240ml of liquid shampoo works wonders. Of course, the amount you personally need and like will depend on your preferences, so experiment. Start with less, and increase in small quantities, say 1/4tsp increments at a time, in 240ml of shampoo.
It is great for children, as well as adults. Try it, and toss out your chemical-based conditioners today!
Related Information:
Turning a homemade bar of natural soap into liquid soap.
The Many Health Benefits of Coconut Oil
Health Benefits of Coconut Oil
Click here to return to Resources.